Tag Archives: PerfectIt

Talking tech: Find and Replace

In this latest Talking tech post, Andy Coulson looks at how Find and Replace can speed up editing and styling references.

In keeping with this month’s theme of references for The Edit, I’m going to take a look at how we can use one of Word’s most powerful in-built tools – wildcard Find and Replace. References have to conform to tight formatting rules, and these lend themselves to using wildcard Find and Replace to tidy them up. This is particularly handy if you have a paper that was written with one form of referencing that needs to be changed to a different one. I’ll give a brief introduction to wildcards, then share some examples that focus on the type of issues in references and finally I’ll take a quick look at using these with Paul Beverley’s FRedit macro and PerfectIt.

Before we get cracking, a word of warning. Many academic authors use reference management software like Mendeley to produce reference lists. This software manages the references outside of Word and links to the Word document. With Mendeley you see references as form fields in the document. If you make changes, the next time the document is opened with a connection to Mendeley the reference list and links are overwritten, losing your edits. If you think this is the case, make sure you clarify how your client wants references edited.

Find and Replace can also be a blunt instrument, so use it with care. While you are refining your search, work on a copy of your text. And don’t use ‘Replace All’ unless you are very clear what you are replacing. It is safer to step through the things being found by using the ‘Replace’ or ‘Find Next’ (if you want to leave something unchanged) buttons.

Wildcards

Word’s Find and Replace feature has a number of hidden extras. If you’ve not already found these, they can be revealed by clicking the ‘More’ button under the ‘Replace with:’ field.

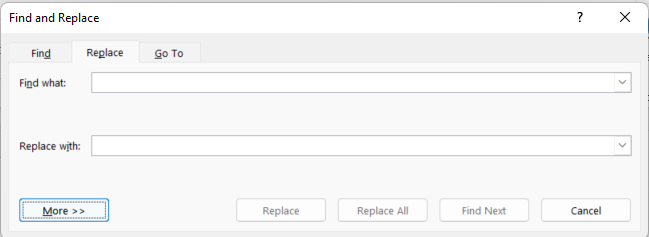
This opens the menu shown below and, as we are going to look at wildcards, we need to check the ‘Use wildcards’ option.

So, what is a wildcard? It is simply a character that can be used to represent anything else. A very simple example is using the character ‘?’ in a wildcard search. If you have ‘Use wildcards’ selected, put ‘r?n’ in the ‘Find what:’ field and ‘ran’ in the ‘Replace with:’ field then press ‘Replace All’, you would replace all instances of ‘ron’, ‘run’, ‘ren’, etc with ‘ran’. The ‘?’ tells Word to find any letter, so it looks for the pattern ‘r’ followed by any letter, followed by ‘n’. This does require a little thought, because what you have now also done, potentially, is turn ‘iron’ into ‘iran’, and a ‘wren’ would become a ‘wran’.

Now that example should alert you to the problems with this, but this is a very simplistic example and to do something more useful we need to dive deeper. Wildcards allow you to specify more complex patterns in the text, and as we will see in the examples below we can do some quite complex searches, often with a little trickery.

As this is a (relatively) short article I’m not going to be able to go into all of the possibilities. The best way to learn how to use these is to experiment. If you want some help, there are a number of resources available:

Examples

Let’s have a look at a couple of reference-related examples in detail so we can see how these work. For the referencing gurus out there, I am going to omit some required information from the references for clarity and play a bit fast and loose with referencing styles.

Example 1: Initials in names

Different referencing systems use different conventions for citing authors’ names in the reference list. So, you may have Hartley, J.R. (APA style), Hartley JR (Vancouver style) or even J.R. Hartley. Usually a reference list will be (largely) consistent, so it has a pattern we can find and a pattern we can replace it with. We will start with these three references:

A.N. Author. (1986). Writing for beginners (2nd ed.). Jones Books

S. Editor. (2021). Editing for fun and profit (1st ed.). MyPub Ltd

I.S.B. Nash. (2007). Cataloguing books (3rd ed.). Big Books Inc.

With Find and Replace we need to break problems down into manageable chunks, and sometimes multiple searches, that can be implemented by Find and Replace. Let’s assume we need to change author-name style in the list to Vancouver. The first issue we can tackle is the structure of the author names – setting them after the surname.

To do this we use the ‘Find what:’ string¹

^013([A-Z.]@) ([A-z]@).

What this does is:

  1. Looks for a line break: ^013 (‘^’ tells Word the number following is a character code. Note that these are for Windows and may be different on a Mac. You can find a list of these in the Wildcard Cookbook and macro book mentioned above).
  2. Looks for one or more initials: ([A-Z.]@) – the round brackets are grouping together and are important when we come to replace things; the [A-Z.] looks for capital letters or a full stop and the @ tells Word to look for one or more occurrences of these. Note that there is a space after this term, like in the text.
  3. Now looks for a capitalised word: ([A-z]@) – a combination of upper- and lower-case letters.

Now we replace the surname first and the initials after using this ‘Replace with:’ string:

^p\2 \1

This replaces the text as follows:

  1. We put the line break back in: ^p – note that we are using a different code here. ‘Why?’ you may ask. Because Word …
  2. Next we put the surname in: \2 – the \2 tells Word to use the second item in round brackets, what we found with item 3 above.
  3. Finally, we add the initials back in after a space – \1 – using the first bracketed item we found in item 2 above.

This leaves us with:

Author A.N. (1986). Writing for beginners (2nd ed.). Jones Books

Editor S. (2021). Editing for fun and profit (1st ed.). MyPub Ltd

Nash I.S.B. (2007). Cataloguing books (3rd ed.). Big Books Inc.

Now we need to remove the extra full points. We have to do that in two steps, by taking out all the relevant full points and then adding back the one after the final name.

So, removing the full points we use this ‘Find what:’ string, which simply finds one capital letter followed by one full point.

([A-Z]).

We then put the capital letter back in using this ‘Replace with:’ string:

\1

This gives us:

Author AN (1986). Writing for beginners (2nd ed.). Jones Books

Editor S (2021). Editing for fun and profit (1st ed.). MyPub Ltd

Nash ISB (2007). Cataloguing books (3rd ed.). Big Books Inc.

Now we add the final full point back in before the bracket with the year. That bracket gives us a pattern we can identify to put the full point in the right place. So, we use the ‘Find what:’ string:

([A-Z]) \(

As before, the round brackets contain a string to find one capital letter; this is followed by a space and finally by \(. ‘What is that?’ you may ask. Well, we use brackets to create a sequence in the search string that we can return to later, so in wildcard searches round brackets (and a number of other symbols) work as commands. In order to refer to those symbols we need to escape it, which means adding a backslash in front, so \( finds an opening round bracket. We can then use the following ‘Replace with:’ string to add the full point.

\1. ^40

As before \1. adds the initial back with the full point and ^40 puts an open bracket back. Again, note the different way that replace refers to the character, but that’s just the way it works I’m afraid. This then gives us:

Author AN. (1986). Writing for beginners (2nd ed.). Jones Books

Editor S. (2021). Editing for fun and profit (1st ed.). MyPub Ltd

Nash ISB. (2007). Cataloguing books (3rd ed.). Big Books Inc.

Example 2: Adding styling

I realise this is not proper Vancouver referencing, but I want to show you how we can add styling using wildcards. In this example we will apply italics to the book titles. As before, we need a pattern to recognise which part is the book title. In this case we have the end of the year ‘). ’ and the start of the edition ‘ (’. However, in order to find the title we have to find more text, the two brackets before and after, which we don’t want in italics. This means we need to be a bit cunning!

To do this we use this ‘Find what:’ string:

(\). )([A-z .]@)(\([0-9])

  1. (\). ) finds a closing bracket \), followed by a period and a space and we want to keep those, so we group them.
  2. ([A-z .]@) looks for a mix of upper- and lower-case letters, spaces and full stops – our surname and initials.
  3. (\([0-9]) looks for an open bracket \( plus a number – the characters at the start of the edition.

If we then replace this with:

\1%%\2%%\3

we put %% before and after the characters of the title that we want to italicise:

Author AN. (1986). %%Writing for beginners %%(2nd ed.). Jones Books

Editor S. (2021). %%Editing for fun and profit %%(1st ed.). MyPub Ltd

Nash ISB. (2007). %%Cataloguing books %%(3rd ed.). Big Books Inc.

We now have the title clearly marked, so can then style that. We search for the modified title with %% before and after.

%%([A-z .]@)%%

We then replace that with just the title text, which we have put in round brackets, so \1 goes in the ‘Replace what:’ field. Before we replace this, we need to tell Word to italicise this text. If you tap on the ‘More’ button in the bottom left you will see a ‘Format’ button. Pressing on this pops up the menu shown below. If you select ‘Font’ the font dialogue box pops up and you can select ‘Italic’. You will also see ‘Font: Italic’ appears under the ‘Replace with:’ field.

Running that Find and Replace gives us our final list:

Author AN. (1986). Writing for beginners (2nd ed.). Jones Books

Editor S. (2021). Editing for fun and profit (1st ed.). MyPub Ltd

Nash ISB. (2007). Cataloguing books (3rd ed.). Big Books Inc.

Integrating with Macros and PerfectIt

Wildcard Find and Replace searches like this are real timesavers, but there’s no obvious way of saving these and using them again and again. There is a short history for both the ‘Find what:’ and ‘Replace with:’ fields if you click the down arrow at the right of each, but I don’t find this particularly helpful.

Both Paul Beverley’s FRedit macro and PerfectIt support using wildcards, so offer a way to reuse multiple Find and Replace searches. As the point of using things like macros and wildcards is to save you time sometimes the investment of time to set up those searches in a macro or PerfectIt may not add up compared to just running the searches. For example, I do some work on papers for academic journals that are about 6,000 words long. I get material for multiple different journals, so it is quicker for me to just use a few Find and Replace searches rather than setting up, say, FRedit. However, a book or multiple papers for the same journal would change that, and setting up FRedit or PerfectIt would then be worthwhile. Having said that, writing this has convinced me to create a file of Find and Replace searches I can refer back to. I will probably format this as a FRedit list so I can use these with that macro.

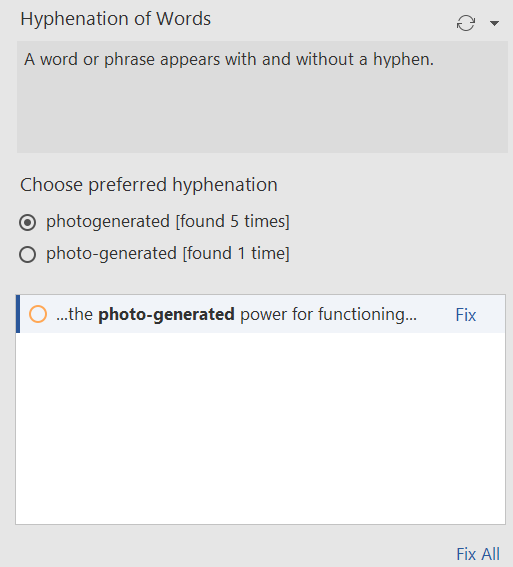
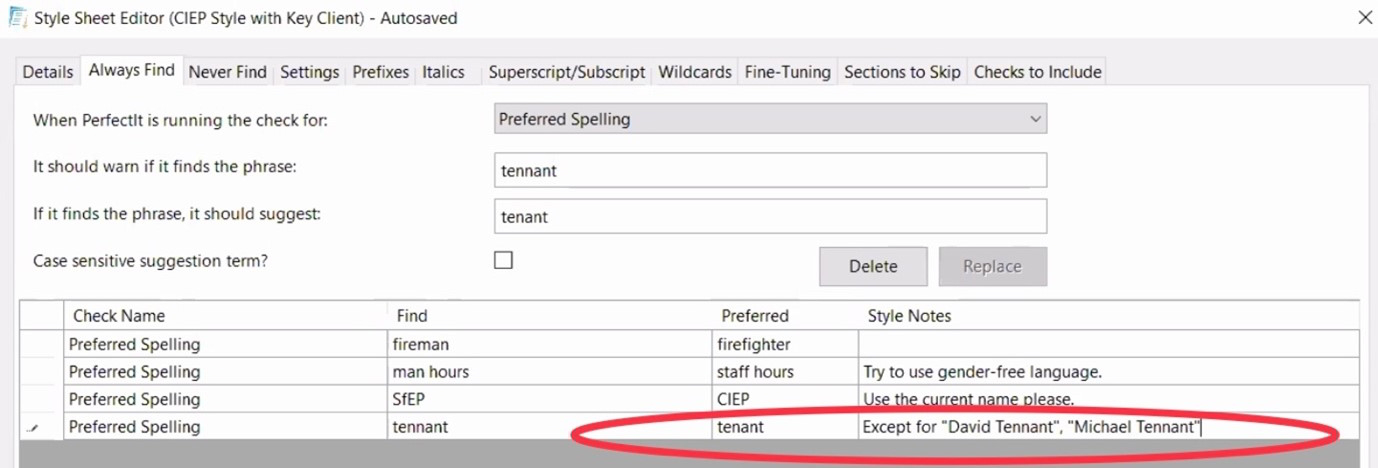
PerfectIt allows you to perform wildcard searches in the ‘Wildcard’ tab. This lets you use all the features of wildcards in Word Find and Replace and adds a couple of neat features. The first of these is that you can add an instruction or prompt that explains what the search is doing, because, as we saw above, patterns can crop up in unexpected places. The second of these is that you can add exceptions. PerfectIt’s manual page uses the example of apostrophes being added to numbers followed by ‘s’, so ‘we have 3s, 4s and 5s chosen’ is correct. However, if we talk about ‘Page 4’s content’ we need the apostrophe. We can make numbers after the word ‘Page’ an exception.

FRedit is a scripted version of Find and Replace, so runs multiple Find and Replace searches from a list. It uses all the forms in Word Find and Replace, but has a few little tweaks you need to use in the file of searches we set up. FRedit doesn’t present us with the dialogue boxes that Word Find and Replace does. So in the file we use ‘|’ to separate the ‘Find what:’ and ‘Replace with:’ terms on a line and add ‘~’ at the start of the line if we are using wildcards. We can also add formatting easily. I sometimes use FRedit to quickly highlight things so I can then take my time on a read-through to check the context. For example, if you have an app called Balance it needs capitalising, but if you also talk about keeping your balance it doesn’t, so you have a mix, but the context will determine which you use.

Hopefully this has given you some ideas and encouraged you to go and experiment. I can honestly say learning how to use wildcards and Find and Replace efficiently has helped speed up my editing enormously. Combining these with FRedit or PerfectIt speeds things up even more where you have longer pieces or house styles you use regularly.


1 Paul Beverley has flagged that while ‘[A-z]@’ will find any letter it does not pick up on accented letters. A better solution is ‘[A-Za-z]@’.

About Andy Coulson

Andy Coulson is a reformed engineer and primary teacher, and a Professional Member of CIEP. He is a copyeditor and proofreader specialising In STEM subjects and odd formats like LaTeX.


About the CIEP

The Chartered Institute of Editing and Proofreading (CIEP) is a non-profit body promoting excellence in English language editing. We set and demonstrate editorial standards, and we are a community, training hub and support network for editorial professionals – the people who work to make text accurate, clear and fit for purpose.

Find out more about:


Photo credits: magnifying glass by towfiqu barbhuiya on Canva, joker by Roy_Inove on Pixabay.

Posted by Harriet Power, CIEP information commissioning editor.

The views expressed here do not necessarily reflect those of the CIEP.

Talking tech: Automating style sheets

In this Talking tech column, Andy Coulson considers the options available for automating style sheets.

The theme of February’s member newsletter, The Edit, is editorial judgement and, as I’m sure you’ll have noticed, this is something computers are not good at! While the latest artificial intelligence systems are great at applying rules consistently and often ruthlessly, they are not good at making those subtle judgements that convey nuanced meaning or reflect an author’s voice. So how can technology help us?

Our main tool for recording our professional editorial judgement is the style sheet, whether that is something created specifically for a job, or by making additions to a style sheet from a client. We have a number of tools that we can use to support our creation of style sheets.

Exploiting your computer’s strengths

So, if our computer is not good at judgement, what is it good for? Computers are very good at following rules and recognising consistency. We can make good use of that to spot patterns in the materials we are working on and inform decisions that we can then record in a style sheet. We can also use these to help us see where exceptions are, as these can be important too (for example judgment in British English refers to a legal judgment; judgement is what you are applying in choosing the right spelling of it!).

One thing I’m not going to look at is the Editor tool in Word itself. In theory this should be able to do a lot of the things I’m going to talk about, but I’m afraid I just can’t get on with it. I find that configuring it is too fiddly when you are working on material where the style can change from job to job. I’m going to look at PerfectIt and Paul Beverley’s macros, as both of these will ultimately allow you to do things quicker and, to my mind, more accurately as editors and proofreaders.

PerfectIt

PerfectIt is a proofreading and consistency add-in for Word. Many of us use it to speed up our workflow and it can be used to help with identifying style sheet issues with the text you are editing. When you run PerfectIt, the content of the document is compared against a number of tests. You can use the results to identify what needs to be included in the style sheet.

Let’s have a look at an example. I’ve got a journal article that the client needs to be in US English and they prefer to use the Merriam-Webster dictionary for spelling. I’ve selected the basic ‘US Spelling’ style in PerfectIt, but you may be able to find (or create) a more comprehensive style sheet that is more applicable. If you regularly use PerfectIt it would be worth keeping an eye on the ‘PerfectIt Users’ group on Facebook, as they are developing a collaborative style sheet project.

Here one of the tests is checking the consistency of hyphenation. As we can see, the author has used ‘photogenerated’ five times and ‘photo-generated’ once. This flags that we need to check and make a judgement. This isn’t in Merriam-Webster, but ‘photoactivated’ and ‘photometered’ are, so I feel comfortable going with the single word and can justify the choice, and that goes on the style sheet.

Hopefully you can see how you would go through and build your style sheet in this way, using the computer’s strength around consistency checking.

Macros

I’ve written before about Paul Beverley’s macros (archivepub.co.uk/index.html) – they are a brilliant resource and Paul contributes so much to the community with these. I’m not going to give detailed instructions about using the macros highlighted as Paul’s book and videos do that really well. I’ll concentrate on an overview of the tools you can use to create a style sheet at the start of a job. Paul also lists his editing process in the book or in his Macro-aided book editing video, and this includes using the macros to identify potential style sheet items.

Overall, I think I prefer this approach to using PerfectIt, although I do use both tools for different jobs. I work on a lot of school textbooks and I find that the macros are able to do a lot more tidying up of formatting than PerfectIt, so they suit my workflow better.

Two key macros to start with are DocAlyse and HyphenAlyse. DocAlyse is a ‘Swiss army knife’ tool that looks at a range of features of the document, such as how numbers appear, approximate US and UK (and -is/-iz) spelling counts, Oxford (serial) comma counts and so on. All of these give you a broad view of your author’s preferences. Paul also has the UKUScount and IZIScount macros that provide more accurate counts if the language and spelling choices are unclear, and SerialCommaAlyse that counts serial comma use more accurately. You can then apply your judgement to the results and record those in the style sheet.

Next up is HyphenAlyse, which looks at hyphen and en dash usage in the document and creates a list of hyphenated phrases along with their open equivalents as well as commonly hyphenated prefixes (for example, net-zero and net zero or coordinate and co-ordinate). The output gives you counts of each usage, helping you to narrow down your choice and again build the style sheet.

SpellAlyse can then be used to make a list of potential spelling issues – this will help identify spellings specific to the topic or flag words that need checking. SpellAlyse has a number of other tricks up its sleeve and Paul’s book explains these. In addition, ProperNounAlyse and CapitAlyse try to identify proper nouns and capitalised words, again helping to inform the choices you make, which can be added to the style sheet.

Unlike PerfectIt you don’t see these in context, but Paul has a number of highlighting macros that can help with this. Because all of these macros produce outputs in Word files it is quick to add things to a style sheet. It is also fairly easy to create a file to use with Paul’s FRedit macro, which performs a scripted find and replace on your file. As well as building a list of corrections to apply to the files you could also use FRedit to highlight a range of issues in the document so you can make decisions about them.

Macros do take a little getting into, but the time savings that they can provide make this time well spent. Over a few jobs you will be able to identify a set of macros that help you create an efficient process, and you will be able to allocate keystrokes to them and create backups.

Hopefully I’ve convinced you to invest a bit of time in learning these tools, as in the longer term they can be real time savers. As ever, back up your customised PerfectIt style sheets (.pft files) and FRedit script files as you can often use and adapt them. There are also lovely people out there sharing other resources like this that they have created. Among the places you can find these are the CIEP forums, where there’s a dedicated ‘Macros’ forum; and the ‘PerfectItUsers’ group on Facebook.

About Andy Coulson

Andy Coulson is a reformed engineer and primary teacher, and a Professional Member of CIEP. He is a copyeditor and proofreader specialising In STEM subjects and odd formats like LaTeX.


About the CIEP

The Chartered Institute of Editing and Proofreading (CIEP) is a non-profit body promoting excellence in English language editing. We set and demonstrate editorial standards, and we are a community, training hub and support network for editorial professionals – the people who work to make text accurate, clear and fit for purpose.

Find out more about:


Photo credit: laptop by Skitterphoto on Pexels.

Posted by Harriet Power, CIEP information commissioning editor.

The views expressed here do not necessarily reflect those of the CIEP.

The 2021 CIEP conference: How to check text with The Chicago Manual of Style for PerfectIt

This year’s CIEP conference was held online, from 12 to 14 September. Attendees from all over the world logged on to learn and socialise with their fellow editors and proofreaders, and a number of delegates kindly volunteered to write up the sessions for us. Marieke Krijnen reviewed How to check text with The Chicago Manual of Style for PerfectIt, presented by Daniel Heuman.

In one of the most joyful announcements of the year, a perfect union was proclaimed: The Chicago Manual of Style (CMOS) and PerfectIt (PI) had been working together to integrate the former into the latter! Like anyone who uses PI and CMOS religiously, I was thrilled.

I adore CMOS. A client has called me ‘the Yoda of Chicago style’. I cite passages from the manual as if they’re from a holy book (‘Changing a dash in a quotation is permissible; CMOS 17, 13.7’). I say ‘Chicago’ when referring to the style, not the city (leading to interesting misunderstandings with my husband, a UChicago alum). I was first introduced to CMOS when a publisher took a chance on me, a newbie editor, asking me to proofread a forthcoming book and check that CMOS 16 was followed. I completed the job within a week and spent long, very long hours scrolling through the manual’s digital version and typing search terms. I discovered that this magical book had something to say about pretty much everything one could possibly wonder about while editing non-fiction. I ordered a hard copy soon after that, and it has little bookmarks all over it. If I had the nerve to get a CMOS tattoo, I probably would.

I’d like to say that I have memorised most of CMOS by now. However, it’s more accurate to say that I am aware of the things CMOS says something about, without me necessarily always knowing what it says precisely about, for example, headline capitalisation, when not to use an ellipsis, how to style the original titles of translated works, and so on. A good editor knows how to look things up, right?

PI’s union with CMOS is so great because it saves you hours of research. I was delighted that Daniel Heuman, PI’s CEO, was coming to talk about this happy union at the CIEP conference. He was joined by Russell Harper, the principal reviser of the 16th and 17th editions of CMOS. And so off we went into a session jam-packed with useful info.

The CMOS plugin for PI checks your manuscript and flags anything that does not seem to conform to Chicago style. It also displays the actual CMOS entry so you can judge for yourself whether the suggested change should be applied. No more opening up the digital edition or your book and looking for the precise entry; it’s right there on your screen! In the actual CMOS online font and style, people. And if you want to see the full entry, just click on its red number and it will take you straight to the digital style guide!

Daniel explained that PI’s philosophy is that ‘people make the best editing decisions’ and that PI seeks to provide the ‘technology to help people edit faster and better’. Therefore, the integration of CMOS into the software does not mean that decisions will be made for you. Instead, the plugin searches the text for you and teaches you the principles of Chicago style.

Not everything in CMOS is included in the check, but the plugin will check for hyphenation, abbreviations, numbers, centuries and decades, punctuation, and possessives, with ‘a focus on style and usage that form the basis of house styles’. Checks are thus not exhaustive, false positives may come up, and context needs to be considered. PI can’t think of every possible exception. For example: ‘daughter-in-law’ is usually hyphenated, but when a sentence such as ‘a daughter in law school’ is flagged, PI relies on you, the editor, to see this and not apply the suggested hyphenation. The takeaway: context is everything, so always carefully check PI’s suggestions!

After a live demo, we learned that the new CMOS style in PI can be combined with any other style in the Windows version. Combining the CMOS style with the UK spelling style is not yet recommended, however. Instead, switch off ‘spelling variations’ when running the CMOS check and then run the UK-style check with all options off except for ‘spelling variations’. Daniel is planning to eventually provide a solution to combine CMOS with other spelling and dictionaries, and he is open to cooperating with other style guides to develop similar plugins. Hence, this wonderful thing can only get better!

Marieke Krijnen is an academic copyeditor and an Advanced Professional Member of the CIEP. She obtained a PhD in Political Science and has a background in Arabic and Middle East studies and urban studies.

In her free time, she enjoys trains, birds, and playing violin. She’s on Twitter as @MariekeGent.


About the CIEP

The Chartered Institute of Editing and Proofreading (CIEP) is a non-profit body promoting excellence in English language editing. We set and demonstrate editorial standards, and we are a community, training hub and support network for editorial professionals – the people who work to make text accurate, clear and fit for purpose.

Find out more about:


Posted by Abi Saffrey, CIEP blog coordinator.

The views expressed here do not necessarily reflect those of the CIEP.

To infinity and beyond – delving into PerfectIt’s possibilities

This year’s CIEP conference was held online, from 2 to 4 November. Attendees from all over the world logged on to learn and socialise with their fellow editors and proofreaders, and a number of delegates kindly volunteered to write up the sessions for us. Suzanne Arnold reviewed Enforcing house styles: Customising PerfectIt for advanced users, presented by Daniel Heuman.

Delegates at the 2019 SfEP conference.

PerfectIt is a Word plug-in that checks for possible consistency issues – eg ‘realise’ and ‘realize’. This was a practical session to help attendees edit style sheets in PerfectIt, with tips for beginners and more experienced users.

My key takeaway: the screens may look intimidating at first, but it’s worth pushing past the fear to see what’s possible.

Getting started

  1. In PerfectIt 4, you can customise style sheets and create new ones; in PerfectIt Cloud you can’t (yet).
  2. The drop-down menu offers built-in style sheets: eg US English, UK English, Australian Government Style.
  3. ‘Check Consistency’ in the drop-down menu means PerfectIt will simply check for potential consistency issues within the text, without looking for compliance with a particular style.
  4. To edit a style sheet, choose ‘Manage Styles’ in the toolbar. Use the drop-down menu by ‘Current style sheet’ to select the style you want to edit, then click ‘Edit Style Sheet’.
  5. To create a new style sheet, choose ‘Manage Styles’ and then ‘New’.
  6. The tabs on the left are the ones you’re most likely to use initially.
  7. Read each tab from left to right, top to bottom. The example below therefore reads, ‘When PerfectIt is running the check for spelling variations it should warn if it finds the phrase “whilst”. If it finds the phrase, it should suggest “while”.’ The top line has a drop-down menu and the other two you type into.
  8. Make separate entries for variations on a word – eg ‘e-mail’, ‘e-mails’, ‘e-mailing’ etc.
  9. And that’s the key to tailoring style sheets in PerfectIt. Yes, there are many other settings you can adjust, but this is all you need to know to get started.
  10. Good luck!

Tips for advanced users

  1. Searches are not case sensitive – so the example below would find ‘SFep’ and ‘sFEP’ etc. But clicking ‘Case sensitive suggestion term?’ ensures that the replacement term ‘CIEP’ is capitalised as specified.
  2. Use the ‘Style Notes’ column to give users more information (see next screen grab).
  3. ‘Except for’ in the ‘Style Notes’ column acts as an instruction to PerfectIt – in the example below, PerfectIt will suggest correcting ‘tennant’ to ‘tenant’ unless it is in ‘David Tennant’ or ‘Michael Tennant’.
  4. If the house style has certain terms that are always abbreviated – eg UK – use the ‘Never Find’ tab, select ‘Abbreviations Without Definitions’ from the drop-down and then type in the abbreviation that doesn’t need writing out.
  5. In the ‘Settings’ tab, scroll to the bottom and there are some options called ‘Style Points’. These are switched off by default, but you can switch them on in the same way as for other checks.
  6. The ‘Fine-Tuning’ tab initially looks pretty daunting, but all you need to know is that the words separated by pipes | will be treated in the way described on the left.
  7. If you only have a PDF, you can open some PDFs within Word and it will convert it to text. It may not look pretty but it will allow you to use PerfectIt.

Suzanne Arnold is an Advanced Professional Member who specialises in copyediting and proofreading non-fiction for adults.


Posted by Abi Saffrey, CIEP blog coordinator.

The views expressed here do not necessarily reflect those of the CIEP.

What’s e-new? The efficient guide to Word

By Andy Coulson

This issue of The Edit has a theme of working efficiently, so let’s take a look at how we can persuade every editor’s favourite tech tool to work efficiently.

1. Keyboard shortcuts

Keyboard shortcuts are a great little time saver. Think about what you do when you use a mouse – you move it about to try to line up a pointer on a (small) target. You then click and, depending on what you want to do, perhaps repeat this two or more times to get to your command. But with a shortcut you press two or three keys together, and away you go. ‘How-To Geek’ has a really good list.

You don’t have to accept Microsoft’s default choices, either. If you go to Options > Customize Ribbon you’ll see an option at the bottom to customise keyboard shortcuts. This allows you to set up shortcuts for any commands. You can also allocate shortcuts to macros (see below).

2. Styles

Styles offer you a way to quickly format elements of the document. However, they can be a bit fiddly to use. In Word 365, the styles appear in the Home ribbon, as well as in the Quick Access Toolbar at the top. Often you’ll find you use the styles already in the document, and you simply apply them by putting your cursor in the block of text you want to style and then clicking the style name.

But, what do you do when a client says ‘make file A look like file B’? Word has a mechanism to copy styles between documents, but it’s well hidden. You can add the Developer tab to the ribbon, which you do by going into File > Options > Customize Ribbon and selecting ‘Developer’ from the list on the left. Make sure ‘Main Tabs’ is selected at the top of the list on the right and then click ‘Add’.

In the Developer tab, click on ‘Document Templates’, and then ‘Organizer’ in the ‘Templates’ tab of the pop-up box. You will see two lists. The one on the left should have the file name of your current document underneath. On the right-hand one, click ‘Close File’, and this will clear the list, then change to ‘Open File’. Click on it and select the template or document you want to import from. You can then simply select the styles you want and click the ‘Copy’ button to import these to your document.

3. Wildcards

If you use Find and Replace, learning to use wildcards will transform your searching. These allow you to look for patterns rather than specific words. For example, ‘?ed’ tells Word to find ‘ed’ preceded by any other single character, so it would find ‘red’, ‘bed’, ‘Red’ or ‘Bed’ and so on. This can get complicated, but it can also be a real time saver. One of my favourite applications is cleaning up question numbering in textbooks where I can’t use auto-numbering. Here, searching for ‘([0-9]{1,2})\)^s’ and replacing with ‘\1^t’ would change one- or two-digit numbering like this: ‘1.<space>’ to ‘1<tab>’.

There are an awful lot of options, and one place to find help on these is Jack Lyon’s Wildcard Cookbook for Microsoft Word, which is available as a PDF ebook. I have it open in my ebook reader most of the time I’m editing in Word. Geoff Hart’s Effective Onscreen Editing also has a chapter on making the most of Find and Replace.

4. Macros

Macros are short programs that build on the capabilities of Word. They often link together a number of functions within Word to achieve a more complex task, be that something which finds information about the document, changes what you have selected or makes global changes.

Many of you will be aware of Paul Beverley and his macros, and I can’t suggest a better way in to macros than Paul’s Macros by the tourist route. This is a really good introduction to using macros, and will lead you to Paul’s amazing macro library. Once you get into using these you can really start saving time on your work in Word.

Among my favourites are DocAlyse, which runs a range of tests on a document to flag the types of issues it may have; WhatChar, which identifies any character; SpellingErrorLister, which creates a list of potential spelling errors; and HyphenAlyse, which identifies the frequency of hyphenated words (and their non-hyphenated equivalents) and checks common prefixes.

The CIEP has also produced a fact sheet about getting started with macros.

5. Add-ins

Add-ins go a step further than macros. They are programs that work within Word to add more functions. Many of you will have heard of PerfectIt, and this is a good example. PerfectIt will check consistency in the document in a way that Word’s tools simply can’t. You can install stylesheets to suit particular clients (or create your own). I recently had a job using Chicago style (CMOS), and through the forums (thanks, Hilary Cadman!) found a ready-built one that was a big help.

PerfectIt is not the only add-in you can use. I’ve talked about ClipX before, which is an add-in to Windows rather than Word. It’s a clipboard expander that allows you to see the last 25 entries in your clipboard, so you can reuse them. I’ve just discovered it too has add-ins and one, Stickies, maintains a constant list of entries. I use this a lot when I’m manually tagging a file, so I can quickly insert tags.

6. Learn Word

I’ve saved this for last, but perhaps it should be first. Invest some time in learning to use Word to its full potential, as it will repay you time and again. Many of the things above are rooted in a knowledge of how best to use Word. As you get more familiar with Word you’ll be able to customise your set-up, helping you to use it more efficiently. A great resource to help with this is the CIEP course Editing with Word. This will give you a good introduction to many of the things I’ve talked about above.

Andy Coulson is a reformed engineer and primary teacher, and a Professional Member of CIEP. He is a copyeditor and proofreader specialising In STEM subjects and odd formats like LaTeX.


‘What’s e-new?’ was a regular column in the SfEP’s magazine for members, Editing Matters. The column has moved onto the blog until its new home on the CIEP website is ready.

Members can browse the Editing Matters back catalogue through the Members’ Area.


Photo credits: keyboard – Halacious; tourist map – pixpoetry, both on Unsplash

Proofread by Emma Easy, Intermediate Member.
Posted by Abi Saffrey, CIEP blog coordinator.

The views expressed here do not necessarily reflect those of the CIEP.