
In this month’s Talking tech column, Andy Coulson looks at getting the most out of your clipboards. There’s more than one, for a start, and they include several tools and functions you might not have known about.

We all use the clipboard frequently: that useful little bit of temporary storage that allows you to copy a bit of text and repeatedly paste it into a document can often simplify repetitive jobs. However, a recent job that meant adding a lot of tags to the text to tell the typesetter how to style the paragraph, like <A> to flag that the current line is an A head, really highlighted the limitations of this and got me looking at whether there might be better ways to do things.
Office clipboard
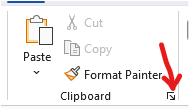 In Windows there are in fact two clipboards if you use Office, as that has its own clipboard. The Office clipboard lets you review the last 24 items stored to it. You can access this by clicking on the little arrow in a box in the Clipboard section of the Home ribbon in Word (indicated by the red arrow here).
You then have a sidebar that gives you access to up to 24 items on the clipboard. You can click on these and paste them into your document. When you get to 24 items the next item you copy goes to the top of the list and the bottom item is removed from the list. This means if you are repeatedly using items then your regularly used items can drop off the bottom of the list. Closing all Office programs will also empty the Office clipboard, so if you are doing something like tagging, it is worth keeping a Word or Excel Window open to preserve your clipboard list.
If you are using the clipboard to rearrange text, there are a couple of ways of working around this problem by bypassing the clipboard and keeping its content intact. The first of these uses the mouse. Select the text to move with the mouse by left-clicking and dragging, then move the mouse to where you want to move the text, hold the Ctrl key and right-click once where you want the text to go. Your text will pop up in the new destination. You can also drag the selected text by keeping the left button pressed while moving to the new location.
The other tool is the spike (named after the old-fashioned spike often found on editors’ desks). This allows you to collect several bits of text from the document and put them elsewhere in the document, or in a new document. Imagine you need to rearrange some paragraphs, clipping lines from two or three places to create a new paragraph. Spike will paste all the items you collect as a single block of text, so you need to think about the order you collect the text in. The first item you clip will be the first item in the pasted text and so on. So, you select the first item and press Ctrl+F3. This cuts the item to the spike, but if you want to copy, just press Ctrl+Z after: the item is still on the spike, but remains in its original place too. When you have collected all the pieces you want, place the cursor where they are going (or open a new document) and press Ctrl+Shift+F3 to paste all the items.

Windows clipboard
Windows also has a clipboard that operates in a semi-detached fashion from the Office clipboard. Historically this also had a clipboard history tool which disappeared at some point, but is now back in Windows 11. It can be enabled by going to Settings, System, Clipboard and turning ‘Clipboard history’ on at the top of the list. Ctrl+V will then bring up the Windows clipboard history.
You can paste directly from here into Word, and this material is saved even when your Office programs are closed. You will notice, if you have Office clipboard open, that the items copied from the Windows clipboard appear in the Office clipboard. This can be a bit confusing, and I’m not entirely sure about the rationale of having two clipboards – I’m assuming it is for compatibility with the Mac version of Word.
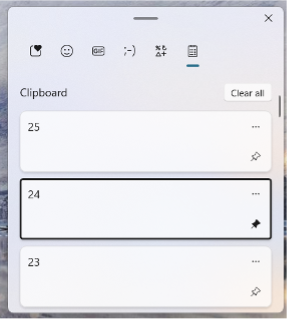
The Windows 11 clipboard history (shown here) has a couple of potentially useful tools. Firstly, you can see that there are various icons across the top. Perhaps the most relevant is the symbols one, second from the right. This is like the ‘Insert Symbol’ command, giving access to all the available symbols for the current font. The other is that you can pin items to the clipboard, by clicking on the little pin to the right of each item (24 in the list in the image is pinned). These are saved until you clear them and are saved in addition to the 24 items in the Windows clipboard, although if you paste into Word they will take up one of the 24 slots in the Office clipboard. You can use this as a way of saving regularly used items (like my tags) and bringing them back into the Office clipboard when you need them. You probably won’t be surprised to learn that there is a macro that does something similar, and I’ll touch on that below.
Useful macros
One particular macro, CopytoClipboard, was discussed on the forums here – contributed by James Baron with a bit of refinement from Paul Beverley. What this does is let you create a Word file and, with the Office clipboard sidebar open, it will populate the clipboard from the file. This is what I ended up using to tag my file. If things dropped off the bottom of the list, I could clear the clipboard and reload from the file. It meant I had a list of tags I could click on to insert, and could import with the correct formatting.
It is also worth looking at Paul’s FRedit macro (or Windows Find and Replace if there are only one or two patterns) to see if there is a pattern you can find to do the pasting or formatting for you. In my tagging example, if there had been numbered headings, you could potentially have searched for heading styles or the pattern of numbering and added the tags automatically. Even if that was only 90% correct in a long manuscript, that could still be a significant time-saving.
Clipboard extenders
Finally, there are various clipboard extender programs that add to the functionality of the clipboard. I have used ClipX in the past, but this hasn’t been updated for several years, so I wouldn’t recommend it. This allowed the clipboard to have more capacity as well as providing ‘stickies’, which were like the pinned items in the Windows 11 clipboard, but were presented in a really useful pop-up menu.
There are many others available, but going by most of the reviews, I have so far avoided trying any, as I think they may actually cause more issues than they solve. If anyone has tried any and rates them, please let me know in the comments, and we can perhaps have a round-up in a future column.
I realise I have not touched on the Mac clipboard, for which I apologise as a non-Mac user. However, the bit of reading around I have done suggests the situation on the Mac is similar. Again, if anyone would like to share their Mac experiences in the comments, we can perhaps revisit this.
To sum up, the clipboard is really several clipboards that operate in similar and overlapping ways. On Windows 11 with Office you have a number of tools for cutting, copying and pasting text that work pretty well. Things start to get a bit trickier if you have to copy and paste a larger number of items frequently – as in my tags example – where copying from another document each time is slow and creates a lot of wear and tear on your mouse hand. It is worth spending some time exploring whether there are better ways of doing this to improve your efficiency and look after your wrists.
About Andy Coulson
 Andy Coulson is a reformed engineer and primary teacher, and a Professional Member of the CIEP. He is a copyeditor and proofreader specialising in STEM subjects and odd formats like LaTeX.
 About the CIEP
The Chartered Institute of Editing and Proofreading (CIEP) is a non-profit body promoting excellence in English language editing. We set and demonstrate editorial standards, and we are a community, training hub and support network for editorial professionals – the people who work to make text accurate, clear and fit for purpose.
Find out more about:
Photo credits: header image by Pixabay, someone typing on a laptop by Breakingpic, both on Pexels.
Posted by Eleanor Smith, blog assistant.
The views expressed here do not necessarily reflect those of the CIEP.